Customize E-mails
Customized E-mails are available in the Security & Compliance plan and higher tiers. See the pricing page for more details.
Syskit Point provides the option to customize e-mails sent to site owners as a part of Workspace Review, Inactive Workspaces, Access Review tasks (replaced by Workspace Review), and other policy tasks.
E-mails are also used to receive scheduled reports available in the Reports section of Syskit Point.
The following aspects of the e-mails can be customized:
- Logo
- Banner
- Subject
- Additional message in the body of the e-mail
These changes can be performed in two locations within Syskit Point Settings:
- General Settings > E-mail section
- Governance Settings > Access Review Options
Please note!
Only Syskit Point Admin users can customize e-mails.
E-mail Settings
In E-mail settings, you can define:
- A global logo that is used in all e-mails sent by Syskit Point
- The recommended size for the logo is 512x50px
- It is best to use a PNG image with a transparent background
- A global e-mail banner that is used in all e-mails sent from Syskit Point
- The recommended banner size is 600x170px
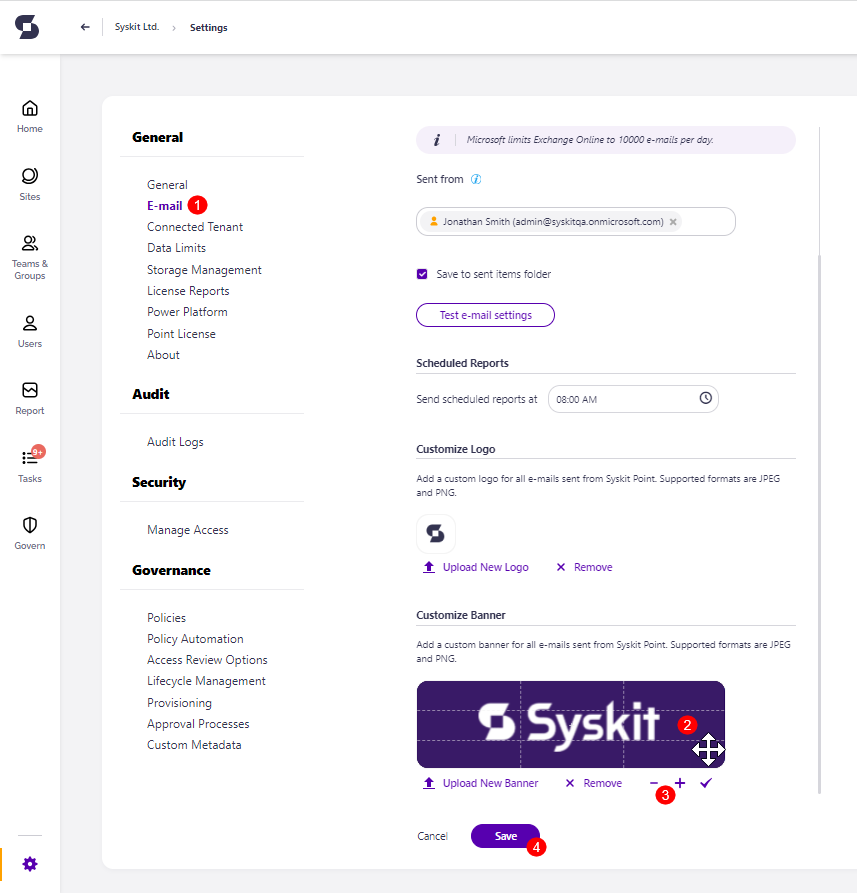
To define a logo used in all e-mails:
- Navigate to the E-mail Settings screen (1).
- Scroll down to see the Customize Logo section
- Drag and drop your logo file (2) to define your logo; keep in mind the supported file formats - JPEG and PNG
- Click Save (3) to save your changes
![]()
To define a banner used in e-mails:
- Navigate to the E-mail Settings screen (1).
- Scroll down to see the Customize Banner section
- Drag and drop your banner file to define your banner; keep in mind the supported file formats - JPEG and PNG
- Drag the added image (2) to adjust the position
- Zoom in or zoom out (3) to adjust the view
- Click Save (4) to save your changes
Hint!
Modifying the logo and banner as described here is a global action, meaning that it will affect all e-mails.
Customize Workspace Review E-Mail
Hint!
The customization affects automatic e-mails sent for workspaces with assigned Workspace Review policies. For more information on that topic, visit the following article.
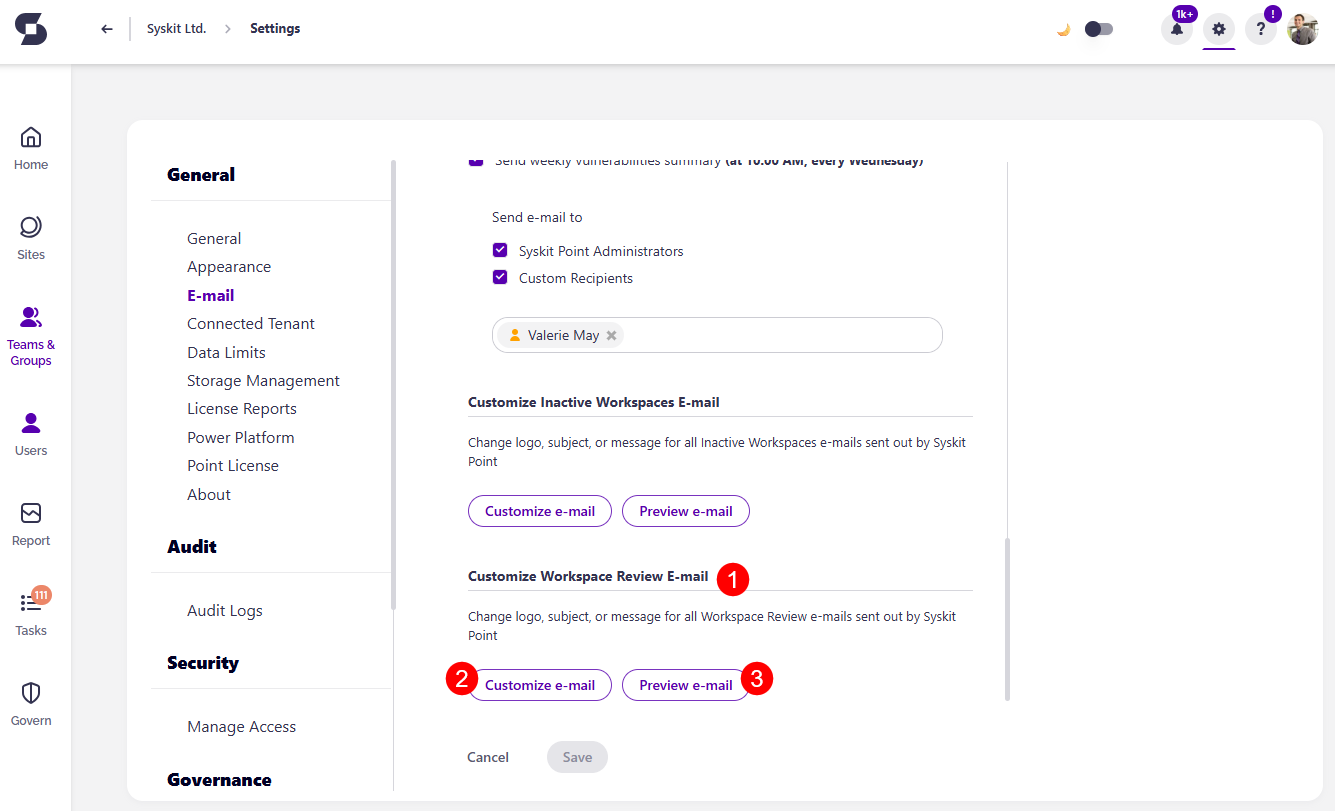
To customize the Workspace Review e-mail, navigate to Settings > General > E-mail > Customize Workspace Review E-mail (1).
Here you can:
- Customize the Workspace Review e-mail (2) by clicking the Customize e-mail button
- Preview the Workspace Review e-mail (3)
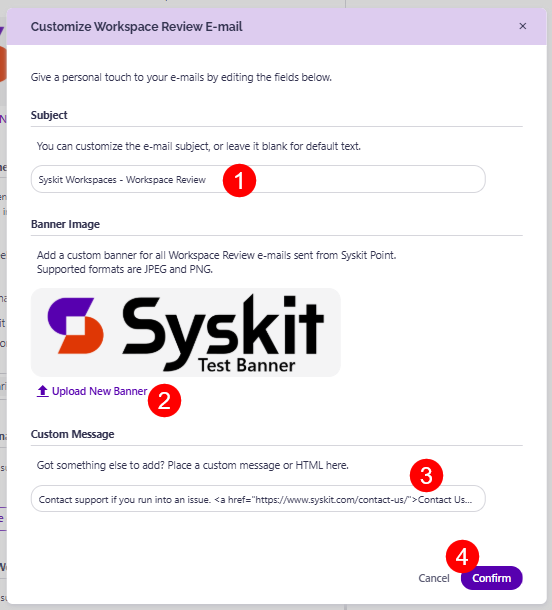
After clicking the Customize e-mail button, you will see the following sections:
- Subject (1) - only applies to the Workspace Review e-mail sent to the owners and administrators
- Upload new banner image (2) - only applies to the Workspace Review e-mail sent to the owners or administrators; initially, a default banner image is set up
- Define custom message (4) - only applies to the Workspace Review e-mail sent to the owners or administrators
When finished, click the Confirm button (5) to save your changes.
Please note!
The custom message can contain plain text or HTML. A link has to be defined in the HTML form <a href="URL">LinkDisplayText</a> where URL represents a web address to a web resource, and the LinkDisplayText is an arbitrary text that will be displayed in the e-mail, and, when clicked, lead to the defined URL.
You can immediately see the e-mail changes by clicking the Preview e-mail button, and a preview dialog opens, showing what your e-mail would look like when sent.
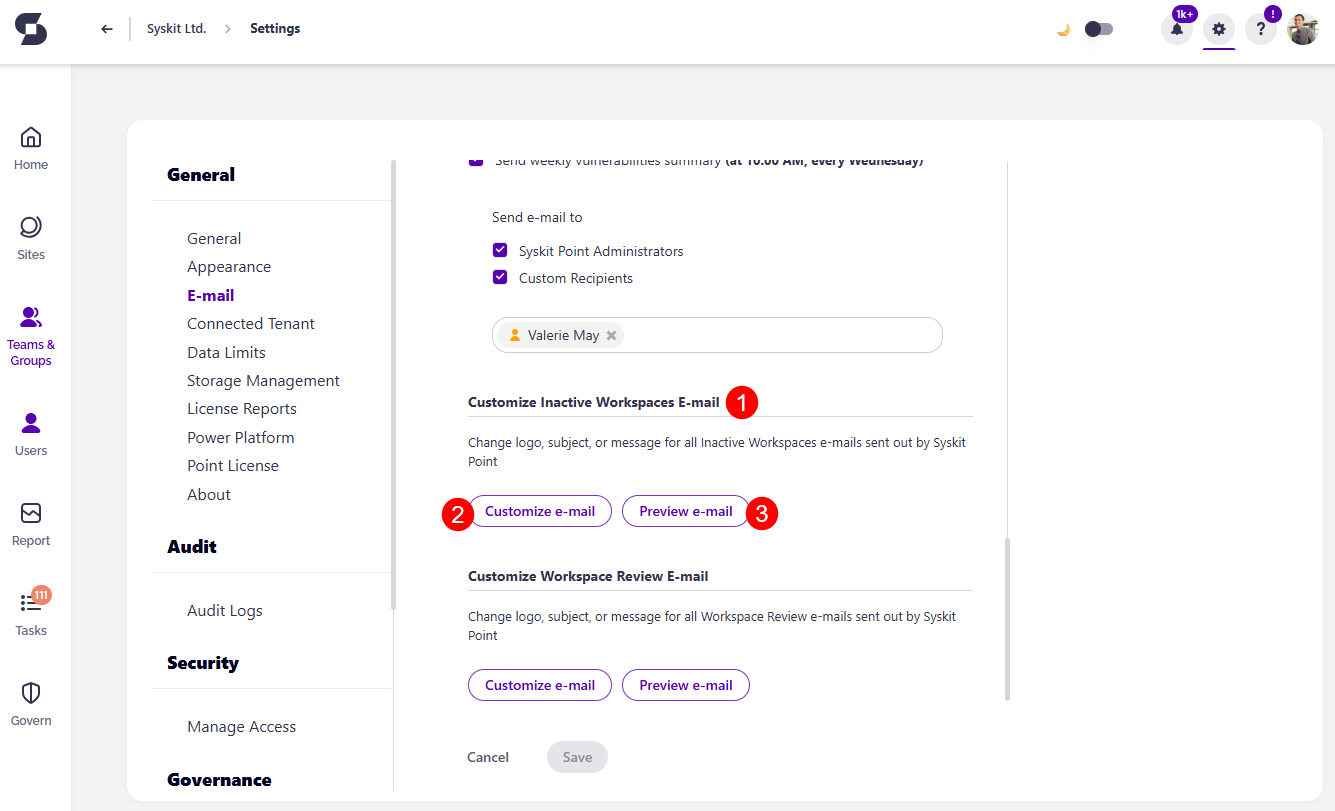
Customize Inactive Workspaces E-Mail
Hint!
The customization affects automatic e-mails sent for workspaces with assigned Inactive Workspaces policies. For more information on that topic, visit the following article.
To customize the Inactive Workspace e-mail, navigate to Settings > General > E-mail > Customize Inactive Workspace E-mail (1).
Here you can:
- Customize the Inactive Workspace e-mail (2) by clicking the Customize e-mail button
- Preview the Inactive Workspace e-mail (3)
After clicking the Customize e-mail button, you will see the following sections:
- Subject (1) - only applies to the Inactive Workspace e-mail sent to the owners and administrators
- Upload new banner image (2) - only applies to the Inactive Workspace e-mail sent to the owners or administrators; initially, a default banner image is set up
- Define custom message (4) - only applies to the Inactive Workspace e-mail sent to the owners or administrators
When finished, click the Confirm button (5) to save your changes.
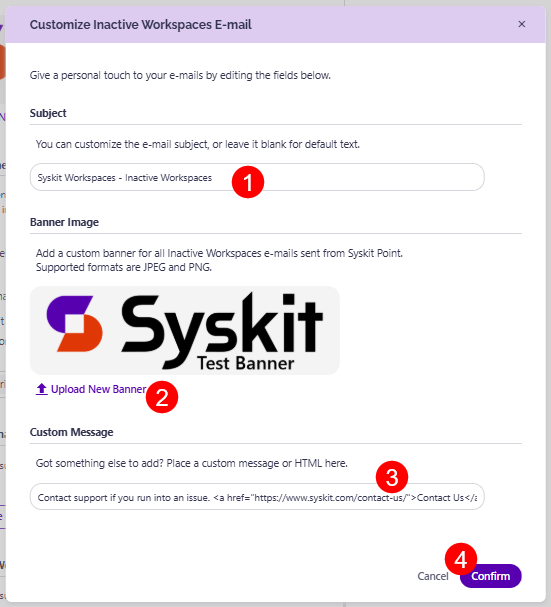
Please note!
The custom message can contain plain text or HTML. A link has to be defined in the HTML form <a href="URL">LinkDisplayText</a> where URL represents a web address to a web resource, and the LinkDisplayText is an arbitrary text that will be displayed in the e-mail, and, when clicked, lead to the defined URL.
You can immediately see the e-mail changes by clicking the Preview e-mail button, and a preview dialog opens, showing what your e-mail would look like when sent.
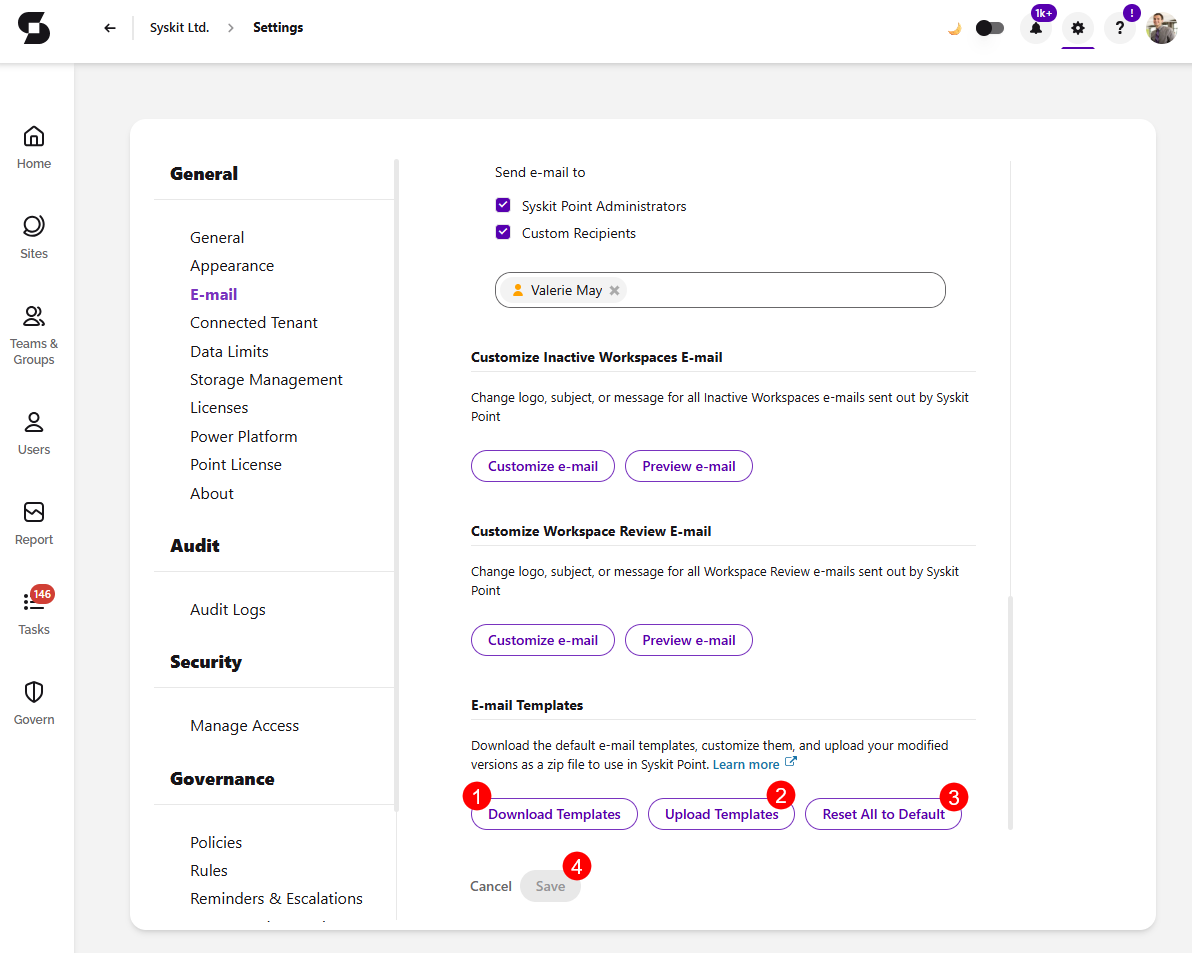
E-mail Templates
The E-mail Templates section in E-mail Settings lets you download the Syskit Point built-in templates, edit them to match your organization's requirements, and upload your customized versions. You can also reset all e-mail templates to their default setting.
This is useful when you want to, for example, add organization-specific legal disclaimers or footer content to e-mails or adjust the HTML structure of a template to match your company's branding guidelines.
Please note!
Uploaded templates take effect immediately. All e-mails sent after the upload will use the new templates.
Please note!
E-mail templates apply globally. Some templates are shared across all policies that use them:
GroupByResolverAndPolicyTypeTemplateGroupByPolicyTypeWithSeparateReassignemailTemplateGroupByPolicyTypeRiskAcceptedTemplateGroupByNewOwnerTemplate
These templates are used by the Not Enough Owners, Too Many Owners, Orphaned Workspaces, and Inactive Workspaces policies. If you edit any of them, the changes apply to every policy that uses the template. It is not possible to customize a template for a single policy.
If you want per-policy wording, use the subject, banner, and custom message customization available for individual policies, for example Workspace Review and Inactive Workspaces. For the full list of templates and the policies that use them, take a look at the E-mail Templates Overview article.
To manage e-mail templates, navigate to Settings > General > E-mail > E-mail Templates.
Here you can:
- Download Templates (1) - clicking this downloads a zip file containing all e-mail templates included by default in Point. The zip file you receive contains two folders:
- Default - this folder always contains the original built-in templates.
- Custom - this folder is included only when there are customized templates and contains the modified templates.
- Upload Templates (2) - clicking this lets you upload a zip file containing your modified templates to apply them. Two rules apply:
- HTML files must be in the root of the zip, not in subfolders.
- The file name must match the original template name exactly.
- Files with unrecognized names are ignored.
- Reset All to Default (3) - clicking this removes all customized templates and reverts to the default built-in Point templates.
- Clicking Save (4) stores any changes you made.